

This article describes what shared preference is, how to use it in an android application, and to generally give a simple understanding to any developer wanting to learn about it. I will begin by an illustration on how it is used in a mobile application. Suppose you install and open a new application, you are introduced to either a welcome screen, which possibly describes or gives you an illustration on how to use the app, or, a sign up screen, you key in your details and possibly there is a ‘remember me’ check box that if you click (or mark) you expect not to sign up or the illustration again. So, if you close the app and open it again you are taken to the Home Screen (or app content) directly without following the same process and your details’ saved. On the Backend, all these savings and data storage is done by a dependency in flutter called shared preferences. So what exactly is this shared preference?
Shared preferences is used to store/save small amounts of data permanently and also retrieve the same data in a form of key-value pair, that will be retained even after the user closes the application. It stores data such as settings, properties, username but not recommended for passwords or any sensitive data because it is not encrypted, it is also not a solution for Complex, relational data. There are only two ways the data can be lost, this when:-
- clears the application data entirely
- one uninstalls the application.
Since flutter uses both iOS and Android, in iOS the same feature is known as NSUserDefaults, (but this article will be focused on Android).
How to use Shared Preferences.
Step 1: To get data from shared preference, first, get the dependency from flutter packages in pub.dev, add the latest dependency to the pubspec.yaml file, and run the packages.get to install it.
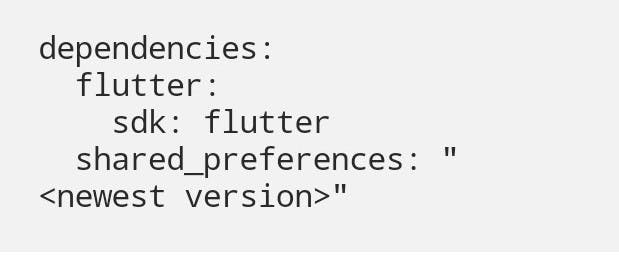 Image of pubspec.yaml
Step 2: to use it in Dart, import a package to your dart file:-
import: 'package:shared_preferences/shared_preferences.dart';
Step3 : To get and save data we use to functions, the get and set methods, in both methods we begin by getting the instance of the shared preferences.
The sharedPreference.instance is a Future (meaning it does not return data immediately) so the get and set methods must be asynchronous to avoid throwing exceptions, as shown below:-
Let’s look at the methods separately:-
The get method:-
- It is mainly used to return a set of variable/data type( either String, Integer, Boolean, or Double) values which is associated with the corresponding Key.
A key :- is a value of type String by which you uniquely identify the data in shared preferences.
- *you can use any object name other than prefs
An example:-
getNewUser() async{
    SharedPreferences prefs = await SharedPreferences.getInstance();
        bool storeDataHere =prefs.getBool(‘key’);
//Note:this will return null if the user visits for the first time, to prevent it from doing so we use the null oprator and save a value to it, in this case save it to false, in integer you can use 0
        bool storeDataHere =prefs.getBool(‘key’) ?? false;
        return storeDataHere;
}
The set method:-
- Once the user has visited the application for the first time, we need to set the value using the key provided on the getter method.
setNewUserValue() async{
    SharedPreferences prefs = await SharedPreferences.getInstance();

        bool storeDataHere =prefs.setBool(‘key’, bool corresponding_value);

}
Note – the data type of the corresponding value should be similar to that of the set method so that it doesn’t throw an exception.
And finally you call the get method on the location (for example onPressed) where a user will be prompted to navigate to the next screen. Remember the get method is asynchronous therefore, the onPressed or whichever function you call it into must be asynchronous too.
From here you can use if loops to specify specific navigations if necessary.
In conclusion, to remove the pair associated with the key you can use the following line of code:
Future < data_type > remove(String key)